Connecting ESP8266 by MQTT to a server like Mosquitto is relatively easy. You need just one dependency (in platformio.ini file):
[env:d1_mini]
lib_deps =
  PubSubClient
Code for a connection is:
WiFiClient espClient;
PubSubClient mqttClient(espClient);

static void callback(char* topicChar, byte* payloadByte, unsigned int length) {
  String topic = topicChar;

  // Default size is defined in PubSubClient library and it's limited to 128
  // https://github.com/knolleary/pubsubclient
  char buf[MQTT_MAX_PACKET_SIZE];
  if (length >= MQTT_MAX_PACKET_SIZE) {
    length = MQTT_MAX_PACKET_SIZE - 1;
  }
  snprintf(buf, length + 1, "%s", payloadByte);

  String payload = String((char *)buf);
  Serial.print(payload);
}

void setup() {
  mqttClient.setServer("iot.georgik.rocks", 1883);
  mqttClient.setCallback(callback);
}

void reconnect() {
  if (mqttClient.connect("display")) {
    subscribeTopics()
  } else {
    Serial.println("Connection failed");
  }
}
Code for a subscription to topic is:
void subscribeTopics() {
  mqttClient.subscribe("some/topic/data");
}
Code for publishing to topic is:
mqttClient.publish("other/topic/data", "123");
This works fine with Mosquitto in trusted environment. You can find sample implementation in LampESP branch v0.3 in file LampMQTT.ino.
When you switch to cloud environment you have to take in consideration security model of the cloud. E.g. Microsoft Azure IoT Hub does not support direct communication between devices. Similar limitation is true also for IBM Bluemix. The architecture of messaging must be little bit different.
How to change the code to connect to IBM Bluemix?
First of all you need to create an account in IBM Bluemix. There is 30 day trial. Then you can use part of services for free, but you have to enter your credit card. The free 370 GB-hours is sufficient to run 512 MB virtual machine during whole month for free.
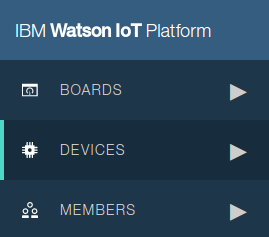
Then you have to create “Internet of Things Platform” service. This service is available only in regions US and United Kingdom. The region Germany does not support this service yet. Once the service is running, go to Dashboard for your service.
You’ll be redirected to URL like: https://ORG-ID.internetofthings.ibmcloud.com/dashboard/#/boards/
There you’ll see IBM Watson IoT Platform Dashboard. Go to Devices.
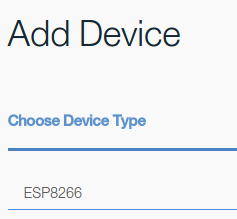
Click “+ Add Device” button. Then click “Create device type”.
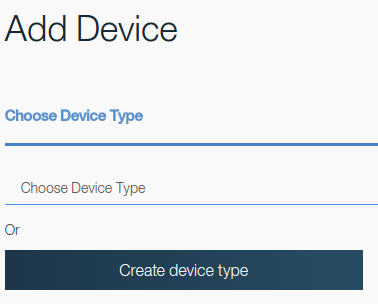
Click “Create device type”.

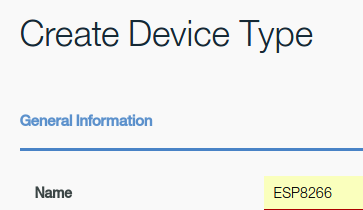
Set name e.g. to ESP8266 and proceed with registration of device type.
Once the type is ready you can define device. Click “+ Add device”. Select your type ESP8266 from drop down. Now careful!
The Next button is in lower right corner. It seems that UX engineers were not validating the interface.

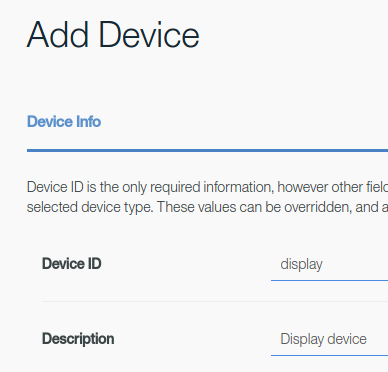
Fill in the name of the device and description.
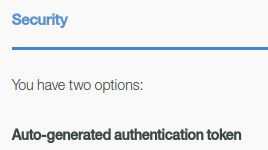
You can skip Metadata. Leave Security set to Auto-generated authentication token.
Skip summary and click Add.
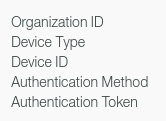
Now you’ll see page with Device. The most important part is section with Authentication token.
The cloud is ready. Now it is necessary to update the code. There is a small gotcha in the server name. If you look at Watson dashboard you might think that’s the hostname for MQTT: ORG-ID.internetofthings.ibmcloud.com. You have to inject subdomain “messaging”. The correct hostname is: ORG-ID.messaging.internetofthings.ibmcloud.com.
...
void setup() {
  mqttClient.setServer("ORG-ID.messaging.internetofthings.ibmcloud.com", 1883);
  mqttClient.setCallback(callback);
}
...
The next important step is to add token which will be used to establish a session between the device and cloud. This is a little bit tricky. You’ll need three parameters which will be composed in the following fashion and supplied to connect method of PubSubClient:
- id = “d:ORG-ID:ESP8266:DEVICE-NAME”
- username = “use-token-auth”
- password = “TOKEN-FROM-DEVICE-PAGE”
void reconnect() {
  if (mqttClient.connect(id, username, password)) {
    subscribeTopics()
In the case of cloud version of MQTT you could not subscribe or publish just to any random topic. You have to follow the format. In the case of subscription to command you have to use following topic: iot-2/cmd/COMMAND/fmt/json. Replace COMMAND, by any of your commands that the device should receive.
void subscribeTopics() {
  mqttClient.subscribe("iot-2/cmd/COMMAND/fmt/json");
}
To publish the device status there is also special topic:
mqttClient.publish("iot-2/evt/status/fmt/json", "{\"d\":{\"value\":\"online\"}}");
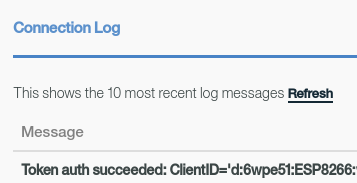
Now you’re ready to connect to the Bluemix cloud. If you experience any problems, just go to device detail and find Connection log.
Now you can connect Node-RED or other tools and communicate with the device. You can find working implementation at LampESP v0.4 project.
Let’s a make summary. There are three gotchas:
- MQTT must be connected to subdomain: ORG-ID.messaging.internetofthings.ibmcloud.com
- Subscription and publishing must follow specific format of topic name
- Auth information must be composed in precisely
Once you overcome this initial barrier then it’s very easy to use Bluemix with Node-RED.
Next article: How to publish topic by mosquitto_pub to Bluemix.