27. April 2019

How to start TigetVNC server on port 5900

When you start TigerVNC server by following command:

vncserver

then it will automatically bind to port 5901.

When you want to start the server on 5900 then you need to type following command:

vncserver :0

This looks a little bit mysterious, but if you dig through the documentation you might find that there is the following mapping:

:0 -> 5900
:1 -> 5901
:2 -> 5902
:3 -> 5903
...

Now it’s clear that when you omit the parameter, it will default to code :1 which is mapped to the port 5901.

11. February 2017

Display server load on Linux Mint desktop delivered via MQTT

In previous article I wrote how to subscribe to MQTT topics and display also timestamp with color. There was one MQTT topic which represented server load and it demonstrates that MQTT could be used for server monitoring.

Here is an example how to measure server load and publish it as MQTT topic. Open crontab:

crontab -e

Add following line:

* * * * * /usr/bin/mosquitto_pub -t /server/reactor/load -m `cat /proc/loadavg | sed -e 's/ .*//g'`

Cron will invoke the command every minute. Command will publish data to MQTT topic /server/reactor/load (note: reactor is the name of my server).

We can subscribe at a workstation to the topic and execute some commands. mosquitto_sub will keep running in the background and we can use xargs to invoke a new command once the new message arrives.

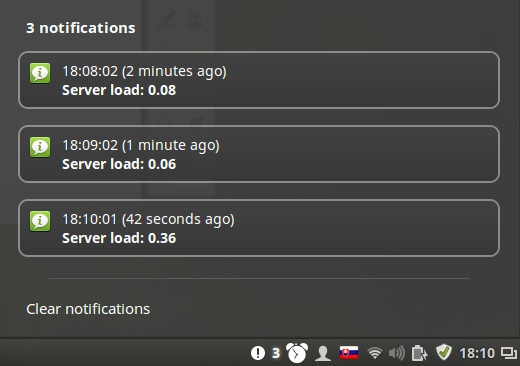
Following example shows how to display notification on Linux Mint – Cinnamon using

mosquitto_sub -t '/server/reactor/load' -h iot.sinusgear.com | xargs -d$'\n' -L1 sh -c 'notify-send "Server load: $0"'

The result at workstation:

The only downside is that notifications are spamming desktop every minute. It does not make sense to notify admin when server load is too low. We can add a little bit of logic and display notifications about load which exceeded a certain threshold.

mosquitto_sub -t '/server/reactor/load' -h iot.sinusgear.com | xargs -d$'\n' -L1 /bin/zsh -c 'if (( $(echo "$0 > 1.2" | bc -l ) )); then notify-send "Server load: $0"; fi'

Note: just be aware that message from MQTT is not sanitized. Run such command only in trusted environment or add type check of value received from MQTT.

Enjoy :-)

6. July 2014

Simple HTTP server in Python 3.x on specific port

One very cool feature of Python 3.x is instant web server. Type the following command on command line:

python -m http.server

The Python will start a simple web server serving content from the working directory at URL: http://localhost:8000.

It’s also possible to specify the port to open, simply add the port number as the next parameter:

python -m http.server 8080

The web server by default operates on all network interfaces. It’s possible to restrict which interface to bind by the following command:

python -m http.server -b 192.168.1.10 8080

This web server will be accessible only from http://192.168.1.10:8080

A similar command is also available for old Python 2.x:

python -m SimpleHTTPServer

28. December 2011

CGI server? Bash one-liner!

Author: Lordrat

By now you know, that when you need simple server to serve static pages just for you to play, you use Python’s SimpleHTTPServer.

But this time I wanted more: I wanted to to able to use serve images caught by my webcam. CGI server would be quick answer. While there is class in python doing that, I did not wanted to play with it. I needed something quick to do and maybe I was just little lazy to do so this day.

First thought: one window while cycle with cam-grabber, in the other window SimpleHTTPServer. Well, the solution lacked elegance, as it was not one-liner-styled enough. And then it occurred to me: why not use Netcat?

Building Blocks


At first, I needed to get data from camera. I had figured how to do that some time ago.

vgrabbj -i vga -d /dev/video0 -a -z 10 -q 100

Let’s just elaborate on that a little bit. vgrabbj takes `640×480` image from video4linux device `/dev/video0`, with enabled brightness adjustment, taking 10 images just to adjust, and using 100% quality of JPEG, and sending it to stdout.

Another building block is “server” to serve something that returned command. NetCat is our fiend. Little-bit of HTTP-fu is needed, but not much.

{ echo -ne 'HTTP/1.0 200 OK\r\nConnection: Close\r\n\r\n'; cat file; } | nc -l 1234

We will be serving JPEG, so we add appropriate HTTP header (unless you can see things in binary garbage).

Content-Type: image/jpeg

It may happen that file-size of image will cripple user’s comfort over slower network. What about speeding it up by sending response gzipped? We will need header

Content-Encoding: gzip

and we will have to use… you guessed it: gzip.

gzip -f

However, gzip will not reduce the size of JPEG much, as it already has entropy quite high. We can decrease quality of image i.g. by switch -q of vgrabbj, but in this case I would prefer ImageMagick for reasons that will become clear in a moment. Another possibility how to deal with this issue is scaling image down, which can be done here as well.

convert - -quality 75 -

It will also be nice to have a non-crippled copy of served file. Can do that: tee.

Serving repeatedly can be done by i.e. by while loop. Small functional enhancement: it will be nice to have so called “auto-refresh”. Adding one HTTP header will do that for us. Say every 5 seconds.

Refresh: 5

Some cooling enhancements? Server header:

Server: CoolServer!

Assembling


And now just put it all together.

while :; do { echo -ne 'HTTP/1.0 200 OK\r\nServer: Kwak!\r\nConnection: Close'\
'\r\nRefresh: 5\r\nContent-Type: image/jpeg\r\nContent-Encoding: gzip\r\n\r\n'\
; vgrabbj -i vga -d /dev/video0 -a -z 10 -q 100 | tee omg-`date +'%Y-%m-%d-%H'\
'%M%S'`.jpg | convert - -quality 75 - | gzip -f; } | nc -l 1234; done

Feel free to unwrap it ;-).
And a non-one-liner (little bit more readable) version:

#!/bin/bash
PORT=1234
QUALITY=75
REFRESH=5
HEADER='HTTP/1.0 200 OK\r\n'
HEADER=$HEADER'Server: CoolServer!\r\n'
HEADER=$HEADER"Refresh: $REFRESH\r\n"
HEADER=$HEADER'Connection: Close\r\n'
HEADER=$HEADER'Content-Type: image/jpeg\r\n'
HEADER=$HEADER'Content-Encoding: gzip\r\n'
HEADER=$HEADER'\r\n'
while :; do
    {
        echo -ne "$HEADER"
        vgrabbj -i vga -d /dev/video0 -a -z 10 -q 100 \
        | tee omg-`date +'%Y-%m-%d-%H%M%S'`.jpg \
        | convert - -quality "$QUALITY" - \
        | gzip -f
    } \
    | nc -l "$PORT"
done

Notes


  • Some versions of nc may need to be called more like `nc -l -p 1234`.
  • First photo will be served from time you started script, every other from time the last shoot was taken. (Exercise for patient reader: why it is so? ;-) ). This might not be issue, as it speeds up reading of photo on request.
  • Previous can be solved by creating script, that can be called by nc on connection. That way you can create even interactive “CGI” script, that will read (and parse) input from std in and write response to stdout. Not all versions of nc are able to do that.
  • Another exercise: Will you be able to secure your communication using stunnel.

Enjoy ;-)
7. January 2011

How to dump POST request with Python

Python contains one helpful module: SimpleHTTPServer. You can expose local directory via HTTP by the following command:

python -m SimpleHTTPServer

Python will start HTTP server at http://localhost:8000

It is very worthy when you’re doing some tests of web application.

The only problem is that SimpleHTTPServer does not support POST. Sometimes it’s very useful to see the content of POST request.

Is there any simple way how to achieve this in Python?

Here is a small extension of SimpleHTTPServer with do_POST handler:

import SimpleHTTPServer
import SocketServer
import logging
import cgi

PORT = 8000

class ServerHandler(SimpleHTTPServer.SimpleHTTPRequestHandler):

    def do_GET(self):
        logging.error(self.headers)
        SimpleHTTPServer.SimpleHTTPRequestHandler.do_GET(self)

    def do_POST(self):
        logging.error(self.headers)
        form = cgi.FieldStorage(
            fp=self.rfile,
            headers=self.headers,
            environ={'REQUEST_METHOD':'POST',
                     'CONTENT_TYPE':self.headers['Content-Type'],
                     })
        for item in form.list:
            logging.error(item)
        SimpleHTTPServer.SimpleHTTPRequestHandler.do_GET(self)

Handler = ServerHandler

httpd = SocketServer.TCPServer(("", PORT), Handler)

print "serving at port", PORT
httpd.serve_forever()

You can download SimpleServer.py here and start it with command:

python SimpleServer.py