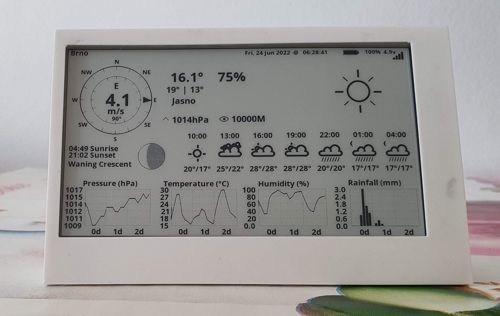
LilyGO TTGO T5-4.7″ E-Paper ESP32 is nice display which integrates ESP32, USB-C, Li-Po and 18650 accumulator support in one board. The display driver is GDEH0213B72.
One interesting use-case for the board is the Weather display.

There are several steps to get the Weather display working. Let’s walk through them.
Drivers
Linux users may skip this section since the modern kernel supports CH34x drivers.
macOS users may encounter the following error when flashing:
Failed to write to target RAM (result was ...)
It’s necessary to install the driver from https://github.com/WCHSoftGroup/ch34xser_macos.
Windows 8, 10 users may need to install https://www.wch.cn/download/CH343SER_EXE.html. Windows 11 should install the driver automatically.
Arduino IDE setup
Add ESP32 boards support. Click File, click Preferences, select Settings tab. Enter the following URL to Additional boards manager URLs:
https://raw.githubusercontent.com/espressif/arduino-esp32/gh-pages/package_esp32_index.json
Click Ok. Click Tools, select Boards: …, click Boards Manager… . It will open the left pane with a list of boards. Type esp32 to Filter your search field. Find esp32 by Espressif Systems, click Install.
Preparing code
Open a terminal and clone LilyGo-EPD47 library to Arduino/libraries:
Linux:
cd ~/Arduino/libraries
git clone git@github.com:Xinyuan-LilyGO/LilyGo-EPD47.git --depth 1
macOS:
cd ~/Documents/Arduino/libraries
git clone git@github.com:Xinyuan-LilyGO/LilyGo-EPD47.git --depth 1
Make a clone LilyGo-EPD-4-7-OWM-Weather-Display to the directory with Arduino projects. The folder name with the project should match the name of the source code file OWM_EPD47_epaper_v2.5 to avoid the unnecessary step of moving the file.
Linux:
cd ~/Arduino
git clone git@github.com:Xinyuan-LilyGO/LilyGo-EPD-4-7-OWM-Weather-Display.git OWM_EPD47_epaper_v2.5
macOS:
cd ~/Documents/Arduino/
git clone git@github.com:Xinyuan-LilyGO/LilyGo-EPD-4-7-OWM-Weather-Display.git OWM_EPD47_epaper_v2.5
Open Arduino IDE 2.0, click File, select Sketchbook, click OWM_EPD47_epaper_v2.5.
The project requires ArduinoJson to build. Click Tools, click Manage libraries… . The pane with Library Manager should open, type ArduinoJson to Filter your search field. Find ArduinoJson by Benoit Blanchon, click Install.
Try to build the project.
It might fail with the following error:
.../Arduino/libraries/LilyGo-EPD47/src/rmt_pulse.c:9:24: fatal error: hal/rmt_ll.h: No such file or directory
compilation terminated.
Multiple libraries were found for "WiFiClient.h"
  Used: .../.arduino15/packages/esp32/hardware/esp32/1.0.4/libraries/WiFi
  Not used: .../arduino-1.8.13/libraries/WiFi
exit status 1
Open the file ~/Arduino/libraries/LilyGo-EPD47/src/rmt_pulse.c and comment out line 9:
/* #include <hal/rmt_ll.h> */
The project should be buildable now.
Configuring local parameters
Open file owm_credentials.h and configure ssid, password, apikey, City, Country.
The project is acquiring data from openweathermap.org. Create new free account in order to get apikey.
The project implementations contain support for power saving, so if you’re flashing in the early morning/late night, you might be surprised that nothing is on display. To change power-saving options open file OWM_EPD47_epaper_v2.5.ino and change WakeupHour to a value that suits your need.
Flashing
Connect the module. Select the board from the dropdown in the toolbar. Click Port (/dev/ttyACMx on Linux), filter for ESP32 Wrover module and click Ok.
Click the Upload arrow.
If the flashing is successful, you may enjoy the new Weather display. Congratulations!
3D printed enclosure
There are several versions of files for 3D printing. You can find them in the discussion at GitHub – LilyGo-EPD47. The picture in this article is based on model thing:4782302 printed on Original Prusa MINI+ with PET-G. The model has a few cosmetic limitations:
- It’s not possible to keep the display standing while USB-C is connected.
- Buttons are not completely reachable.
- The display must be attached by a tape or other method to the stand to avoid detaching from the case.
Notes
Double-check whether the battery holder is present when ordering the board with the display from the e-shop. Even when it’s displayed on the picture, it does not mean that the battery holder or battery is part of the delivery.
When connecting by USB-C to USB-C cable, the device should light up at least a red led. If nothing is visible, rotate the USB-C connected to the board by 180 degrees or use USB-A to USB-C cable.