Two weeks ago I made research about available Smart Home Power Sockets. The result was not very positive.
Week ago I discovered talk about ES8266 which seemed to be the right solution.
And what about this week?
I happy to report success. I am able to control the lamp from mobile phone. :-)
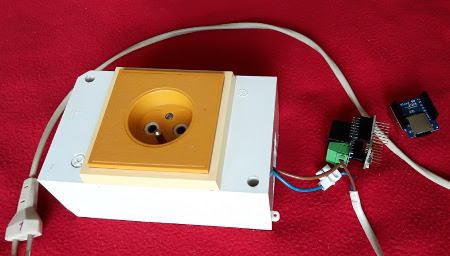
This week I bought WeMos D1 Mini WiFi ESP8266 and relay. Together with friend we soldered few pins and wrote some code. The solution was working immediately after we plugged it into a wall.
Here is the result:
Code for Arduino is derrived from esp8266learning.com:
//This example will set up a static IP - in this case 192.168.1.50

#include <ESP8266WiFi.h>

const int relayPin = D1;
const int chipSelect = D8;
const char* ssid = "MYSSID";
const char* password = "SECRET";

WiFiServer server(80);
IPAddress ip(192, 168, 1, 50); // where xx is the desired IP Address
IPAddress gateway(192, 168, 1, 1); // set gateway to match your network

void setup() {
  Serial.begin(115200);
  delay(10);

  pinMode(relayPin, OUTPUT);

  Serial.print(F("Setting static ip to : "));
  Serial.println(ip);

  // Connect to WiFi network
  Serial.println();
  Serial.println();
  Serial.print("Connecting to ");
  Serial.println(ssid);
  IPAddress subnet(255, 255, 255, 0); // set subnet mask to match your network
  WiFi.config(ip, gateway, subnet);
  WiFi.begin(ssid, password);

  while (WiFi.status() != WL_CONNECTED) {
    delay(500);
    Serial.print(".");
  }
  Serial.println("");
  Serial.println("WiFi connected");

  // Start the server
  server.begin();
  Serial.println("Server started");

  // Print the IP address
  Serial.print("Use this URL : ");
  Serial.print("http://");
  Serial.print(WiFi.localIP());
  Serial.println("/");
}

void loop() {
  // Check if a client has connected
  WiFiClient client = server.available();
  if (!client) {
    return;
  }

  // Wait until the client sends some data
  Serial.println("new client");
  while(!client.available()){
    delay(1);
  }

  // Read the first line of the request
  String request = client.readStringUntil('\r');
  Serial.println(request);
  client.flush();

  // Match the request

  int value = LOW;
  if (request.indexOf("/relay=on") != -1) {
    digitalWrite(relayPin, HIGH);
    value = HIGH;
  }
  if (request.indexOf("/relay=off") != -1){
    digitalWrite(relayPin, LOW);
    value = LOW;
  }

  // Return the response
  client.println("HTTP/1.1 200 OK");
  client.println("Content-Type: text/html");
  client.println(""); //  do not forget this one
  client.println("<!DOCTYPE HTML>");
  client.println("<html>");

  client.print("Led pin is now: ");

  if(value == HIGH) {
    client.print("On");
  } else {
    client.print("Off");
  }
  client.println("<br><br>");
  client.println("<a href=\"/relay=on\">Relay ON</a><br>");
  client.println("Click <a href=\"/relay=off\">Relay OFF</a>");
  client.println("</html>");

  delay(1);
  Serial.println("Client disconnected");
  Serial.println("");
}
That was the easy part. I was able to control relay directly from mobile phone via web browser which was not very convenient. The widget would serve better.
Writing a widget for Android was real challenge. There is very little documentation about it and even Android Studio does not contain template for writing widget. I spent several hours learning how widget works. It is very different from common application.
The very first gotcha that costed me more than a hour was very common problem with builds:
Error:(3) Error retrieving parent for item: No resource found that matches the given name 'android:TextAppearance.Material.Widget.Button.Inverse'.
Yes, it is very clear where is the problem. Or not? :)
It is necessary to fix build.gradle and set proper version of compile dependency. In my case I was targeting API 22, but appcompat was set to 23:
dependencies {
    compile 'com.android.support:appcompat-v7:22.1.1'
}
The real fun begins with the widget code. I cobbled together several chunks of code. Primary source was Obaro’s SimpleAndroidWidget and android-async-http.
Here is the very crude code for Android:
package com.sample.foo.simplewidget;

import android.app.PendingIntent;
import android.appwidget.AppWidgetManager;
import android.appwidget.AppWidgetProvider;
import android.content.Context;
import android.content.Intent;
import android.content.SharedPreferences;
import android.widget.RemoteViews;

import com.loopj.android.http.AsyncHttpClient;
import com.loopj.android.http.AsyncHttpResponseHandler;

import cz.msebera.android.httpclient.Header;

public class SimpleWidgetProvider extends AppWidgetProvider {

    private void getHttpRequest(String state) {
        AsyncHttpClient asyncClient = new AsyncHttpClient();
        asyncClient.get("http://192.168.1.50/relay=" + state, new AsyncHttpResponseHandler() {
            @Override
            public void onStart() {
            }

            @Override
            public void onSuccess(int statusCode, Header[] headers, byte[] responseBody) {

            }

            @Override
            public void onFailure(int statusCode, Header[] headers, byte[] responseBody, Throwable error) {

            }

        });
    }

    @Override
    public void onUpdate(Context context, AppWidgetManager appWidgetManager, int[] appWidgetIds) {
        final int count = appWidgetIds.length;

        for (int i = 0; i < count; i++) {
            int widgetId = appWidgetIds[i];
            String value = "off";
            SharedPreferences prefs = context.getSharedPreferences("LampApp", 0);
            boolean isRelayEnabled = prefs.getBoolean("relayState", false);
            isRelayEnabled = !isRelayEnabled;
            SharedPreferences.Editor editor = prefs.edit();
            editor.putBoolean("relayState", isRelayEnabled);
            editor.commit();

            if (isRelayEnabled) {
                value = "on";
            }
            getHttpRequest(value);


            RemoteViews remoteViews = new RemoteViews(context.getPackageName(),
                    R.layout.simple_widget);
            remoteViews.setTextViewText(R.id.textView, value.toUpperCase());

            Intent intent = new Intent(context, SimpleWidgetProvider.class);
            intent.setAction(AppWidgetManager.ACTION_APPWIDGET_UPDATE);
            intent.putExtra(AppWidgetManager.EXTRA_APPWIDGET_IDS, appWidgetIds);

            PendingIntent pendingIntent = PendingIntent.getBroadcast(context,
                    0, intent, PendingIntent.FLAG_UPDATE_CURRENT);
            remoteViews.setOnClickPendingIntent(R.id.actionButton, pendingIntent);

            appWidgetManager.updateAppWidget(widgetId, remoteViews);
        }
    }


}
That’s not all. When you want to create widget you need to define also special handling in AndroidManifest.xml
<manifest xmlns:android="http://schemas.android.com/apk/res/android"
    package="com.sample.foo.simplewidget">

    <uses-permission android:name="android.permission.INTERNET" />

    <application android:allowBackup="true" android:label="@string/app_name"
        android:icon="@mipmap/ic_launcher" android:theme="@style/AppTheme">

        <receiver android:name="SimpleWidgetProvider" >
            <intent-filter>
                <action android:name="android.appwidget.action.APPWIDGET_UPDATE" />
            </intent-filter>
            <meta-data android:name="android.appwidget.provider"
                android:resource="@xml/simple_widget_info" />
        </receiver>

    </application>

</manifest>
Even that is not enough. You’ll need several small files in res directory including graphics. I won’t describe them here. You can download it from GitHub repo georgik/LampAndroidWidget.
The result?
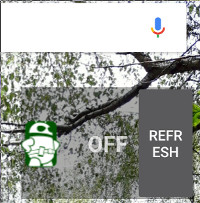
It works perfectly on Samsung Galaxy S5 Neo, but for some reason I was not able to display this widget on Lenovo K5. If you have any idea why Lenovo K5 has such issue, let me know.
I also discovered a bug in the code of widget. When you have more than one widget it starts turning on and off the relay several times depending on number of widgets ;-)
The solution is ok for the time being. I’m already thinking about using MQTT and Node-Red which was discussed this weekend at OpenAlt conference in Brno by guys from McGayver Bastlíři SH.
hi ,i have one dout
i need print ir reciver value in android app with using of esp8266